

To measure ingredients for canning, use a clear liquid cup for liquids, level dry cups and spoons for dry items, and a scale whenever the recipe lists weights. Then follow a tested recipe exactly, because acid, sugar, salt, jar size and headspace protect safety as well as flavor.
Home canning is chemistry in a jar. First, acid keeps harmful bacteria in check, sugar and salt help preserve texture and flavor, and heat does the rest. Because of that, a sloppy scoop is more than a cooking slip. In other words, it can change how safe a finished jar is.
Fortunately, good measuring habits are simple. In this guide you will see which tools to use, how to handle liquids and dry goods, what headspace means, and how altitude fits in. The National Center for Home Food Preservation (NCHFP) explains that the vital controls are the canning method and the research-based process times, and accurate measuring is how you keep a recipe inside those tested limits.
Convert Canning Measurements Instantly
Scaling a recipe up or down usually means switching between cups, tablespoons, milliliters and jar sizes. Enter an amount below, pick your unit, and the converter uses the exact US definitions. However, remember that scaling is for quantities of fruit or vegetables only; never change the vinegar, lemon juice, sugar or salt of a tested recipe unless the recipe gives a scaled version.
Why Tested Recipes Matter When You Measure Ingredients for Canning
A tested recipe is a formula that a lab has checked for safe acidity and heat penetration. As a result, its amounts of vinegar, lemon juice, sugar and salt are not suggestions. According to the NCHFP, acidity controls botulinum bacteria: foods with a pH above 4.6 need pressure canning, while acid foods can go in a boiling-water canner.
Some foods sit on the borderline. For example, tomatoes and figs must be acidified with lemon juice or citric acid before boiling-water canning. Therefore, a half-measured spoonful of lemon juice is a real safety problem, not a small flavor change.
Sugar needs the same respect. Traditional preserves rely on a set amount of sugar plus a short process time, so cutting the sugar can change the result. The NCHFP also advises against replacing sugar with sucralose in recipes that use regular liquid or powdered pectin. Instead, if you want less sugar, choose a recipe written that way, or freeze the jam instead.
Recommended Tools to Measure Ingredients for Canning
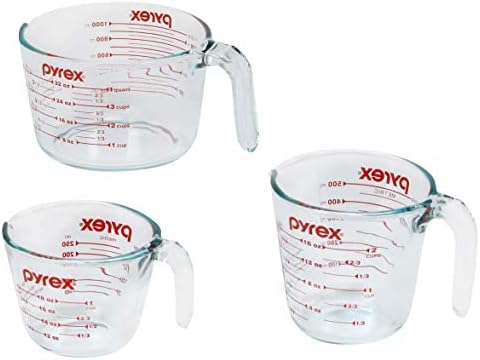
You do not need a large kit. First, a digital scale handles recipes that list weights and double-checks the ones that list cups. Next, a glass liquid cup and a nested set of dry cups cover most work. Finally, a set of measuring spoons with a leveler handles salt, citric acid and spices.



As an Amazon Associate, Measuring Expert earns from qualifying purchases.
If you are shopping for cups, our roundup of the best food measuring cups compares the main styles. For tiny amounts, the best gram measuring spoon set guide is also useful.
Key Takeaways
- Use a tested recipe from the USDA, NCHFP or a university extension service.
- Measure acid, sugar and salt exactly; do not guess or substitute.
- Liquids go in a clear liquid cup, read at eye level on a flat surface.
- Dry goods go in dry cups or spoons, leveled with a straight edge. A scale is more consistent.
- Headspace is part of the recipe: typically 1/4 inch for jams, 1/2 inch for fruit, tomatoes and pickles, and 1 to 1 1/4 inches for low-acid foods.
- Altitude changes processing time or pressure, not ingredient amounts.
Measuring Liquids Correctly
Liquid cups have a spout and extra space above the top line, so you can pour without spilling. By contrast, a dry cup is filled to the brim, which makes a liquid reading unreliable. First, place the cup on a flat counter, bend down until your eyes are level with the mark, and pour slowly until the bottom of the curve (the meniscus) touches the line.
| Item | Best tool | Why |
|---|---|---|
| Vinegar, lemon juice, bottled juice | Liquid cup or marked spoons | Acid amounts are safety-critical |
| Syrup, brine, water | Liquid cup | Easy to read at eye level |
| Honey or thick syrups | Lightly oiled cup, or weigh them | Sticky liquids cling and under-pour |
| Small acid amounts (1 to 2 tbsp) | Measuring spoons | A cup is too coarse for small volumes |
Pay attention to the difference between fluid ounces and ounces by weight. A fluid ounce measures volume (about 29.57 mL), while an ounce measures weight (about 28.35 g). For more on that, read how much an ounce is.
Measuring Dry Ingredients: Scoop, Level or Weigh
Dry cups and spoons are designed to be filled to the rim and leveled. First, spoon the ingredient in gently, then sweep a straight edge across the top. Also, do not pack it unless the recipe says “packed”, as with brown sugar.
Weighing is better still. Cup measures of sugar, salt or pectin can vary with grain size and how settled the container is. In contrast, a scale gives the same result every time. Because different salts have different crystal sizes, a teaspoon of fine pickling salt holds more salt than a teaspoon of coarse flakes. Hence, when a recipe names a type of salt, use that type.
Headspace and Jar Sizes
Headspace is the gap between the food (or liquid) and the lid. It is a measurement too, and tested recipes specify it. For instance, too little can let food bubble out and spoil the seal. Similarly, too much may leave air in the jar and discolor the top layer. Typical starting amounts are listed below, though a recipe’s own number always wins.
| Food | Typical headspace (US) | Metric |
|---|---|---|
| Jams and jellies | 1/4 inch | about 6 mm |
| Fruit, tomatoes, pickles, relishes | 1/2 inch | about 13 mm |
| Low-acid vegetables and meats (pressure canned) | 1 to 1 1/4 inches | about 25 to 32 mm |
Jar size matters as well, because process times depend on it. A half-pint jar holds 1 cup (about 237 mL), a pint holds 2 cups (about 473 mL) and a quart holds 4 cups (about 946 mL). Next, use a ruler or a headspace gauge, and wipe the rim before you place the lid. If you want to see how a cup breaks down into smaller units, the 30 mL guide shows the spoon and ounce equivalents.
How to Measure Ingredients for Canning Step by Step
- Choose a tested recipe. Pick one from the USDA, NCHFP or a university extension service, and note the jar size it uses.
- Gather and prep everything. Wash, peel and cut produce as the recipe directs, then set out your tools.
- Weigh or measure the main produce. Use the scale or the cup measure the recipe lists, because the ratio of food to acid and sugar depends on it.
- Measure acid first. First, pour vinegar or lemon juice into a clear liquid cup, read it at eye level, and add it exactly as written.
- Measure sugar and salt. Level dry cups and spoons, or weigh the amounts, and do not substitute.
- Fill the jars to the stated headspace. Use a ruler or gauge, remove air bubbles, and wipe the rim.
- Process for the right time. Adjust for your altitude and jar size, as the recipe directs.
Altitude Changes Time and Pressure, Not Ingredient Amounts
Water boils at a lower temperature as elevation rises, roughly 1 degree F lower for every 500 feet. Consequently, a jar processed at 5,000 feet does not get as hot as one processed at sea level. The NCHFP states that using sea-level times at 1,000 feet or higher may cause spoilage, so you must choose the time or pressure listed for your elevation.
For boiling-water canning, that usually means more minutes. For pressure canning, it means more pounds of pressure. As one example from the NCHFP, a hot-packed peach recipe in a pressure canner calls for 6 pounds on a dial gauge up to 2,000 feet and 7 pounds from 2,001 to 4,000 feet. So always read the table that comes with your own recipe and canner, because these numbers vary by food and equipment.
Do and Don’t When You Measure Ingredients for Canning
Do
- Use tested, current recipes.
- Measure acid with a liquid cup or marked spoons.
- Level dry cups and spoons with a straight edge.
- Weigh ingredients when the recipe gives weights.
- Check headspace with a ruler or gauge.
Don’t
- Estimate vinegar, lemon juice or salt by eye.
- Swap a dry cup for a liquid cup, or the reverse.
- Cut sugar or acid to make a recipe “healthier”.
- Use sea-level times at higher elevations.
- Use coffee mugs or cutlery as measures.
Honest Limits of Home Measuring
Even so, no kitchen tool is perfect. For one thing, cups from different brands can differ slightly, and even careful leveling leaves a few percent of variation. Moreover, a recipe’s cup amounts for chopped fruit depend on how finely you chop and how tightly you pack. Meanwhile, weights are steadier than cups, but a cheap scale can drift too. In short, measuring well reduces risk, yet it cannot make an untested recipe safe. Process times, pH and canner type matter just as much as the cup you use.
When to Ask an Expert
Therefore, if a recipe seems old, vague or missing steps, check it before you use it. Local extension offices answer canning questions, and the NCHFP and USDA publish tested guides. Likewise, ask an expert when you are unsure about a pressure canner, a dial gauge, or your elevation.
Frequently Asked Questions
How do I measure ingredients for canning without a scale?
Use a clear liquid cup for liquids and level dry cups and spoons for dry items. A scale is more consistent, however, so weigh when the recipe gives weights.
What is the best way to measure ingredients for canning?
Weighing on a digital scale is the most consistent way. Otherwise, use a liquid cup for liquids and leveled dry cups and spoons for dry goods.
Can I use a liquid cup for dry ingredients in canning?
No. A liquid cup is hard to level, so it usually holds more or less than the marked amount. Use dry cups for dry ingredients.
Does measuring ingredients for canning change at high altitude?
No. Ingredient amounts stay the same. Only the process time or canner pressure changes, as listed in your tested recipe.
What is headspace when you measure ingredients for canning?
Headspace is the empty space between the food and the lid. Typical amounts are 1/4 inch for jams, 1/2 inch for fruit and pickles, and 1 to 1 1/4 inches for low-acid foods.
How many cups are in a pint jar?
A pint jar holds 2 US cups, or about 473 mL. A half-pint holds 1 cup and a quart holds 4 cups.
Can I reduce the sugar in a canning recipe?
Not in a recipe that relies on sugar for preservation or texture. Choose a tested reduced-sugar recipe, or freeze the product instead.
Can I double a recipe when I measure ingredients for canning?
Many jam and jelly recipes work best in single batches. Follow the recipe’s directions on batch size, and never change the acid ratio without a tested scaled version.
Why does the type of salt matter in canning?
Different salts have different crystal sizes, so a teaspoon of each weighs a different amount. Use the type the recipe names, or weigh it.
What tools do I need to measure ingredients for canning?
A digital scale, a clear liquid measuring cup, dry measuring cups, measuring spoons and a ruler or headspace gauge cover nearly every recipe.
Measuring for Canning: The Bottom Line
To sum up, accurate measuring keeps a tested recipe inside its safe limits. Weigh or level your dry goods, read liquids at eye level, respect headspace, and add no more or less acid than the recipe states.
Finally, use the converter above when you need to scale quantities or match a jar size, and let a tested recipe, not a guess, decide the rest. When in doubt, ask your local extension office.