

To measure ingredients accurately for baking, use proper tools and follow precise techniques. This ensures your baked goods turn out perfect every time.
Accurate measurements are crucial in baking. Baking is a science. Small mistakes can ruin a recipe. A pinch too much or too little can affect the texture and taste. Using the right tools and methods helps you get the best results.
In this guide, you will learn how to measure ingredients correctly. This will make your baking more successful and enjoyable. Whether you are a beginner or experienced, these tips will help. Get ready to bake like a pro!
Importance Of Accurate Measurements
Accurate measurements are essential in baking. Small differences can affect the final product. Precise measurements ensure consistency and quality. This makes baking more enjoyable and predictable.
Impact On Baking Results
Incorrect measurements can ruin baked goods. Too much flour makes cookies dry. Too little sugar affects sweetness. Proper measurements lead to perfect textures and flavors. Consistency in measuring improves results every time.
Common Measurement Mistakes
Many people make measurement mistakes. Using the wrong measuring tools is common. Cups and spoons are for dry and wet ingredients. Scooping flour directly from the bag packs it down. This results in too much flour.
Another mistake is not leveling off ingredients. Ingredients should be leveled with a flat edge. This ensures the correct amount. Also, don’t guess measurements. Always use proper tools and methods.
Essential Measuring Tools
Measuring ingredients accurately is crucial for successful baking. Using the right measuring tools can make all the difference. Essential measuring tools ensure your ingredients are precise, leading to better results. Let’s explore these essential tools to help you bake with confidence.
Types Of Measuring Cups
There are two main types of measuring cups: dry and liquid. Dry measuring cups are used for ingredients like flour, sugar, and cocoa powder. They come in sets, usually ranging from 1/4 cup to 1 cup. Fill the cup and level it off with a straight edge.
Liquid measuring cups are for ingredients like milk, oil, and water. They usually have a spout for easy pouring. Liquid cups are marked with measurements on the side. Place the cup on a flat surface and check the measurement at eye level.
Using Measuring Spoons
Measuring spoons are essential for small quantities of ingredients. They come in sets, ranging from 1/8 teaspoon to 1 tablespoon. Use them for baking powder, baking soda, and spices. Fill the spoon and level it off with a straight edge for accuracy.
Measuring spoons are handy for both dry and liquid ingredients. Keep them within reach while baking to ensure precision. Accurate measurements can make your baked goods turn out perfectly every time.
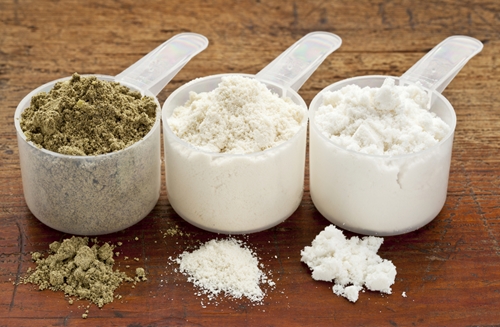
Measuring Dry Ingredients
Hey friends, today we’ll talk about how to measure dry ingredients for baking. Getting it right is crucial. Think about it. Too much flour and your cake is dense. Too little, and it falls apart. So, let’s make sure you’re doing it the right way. Two common methods are the Spoon and Level Method and Weighing Ingredients. Let’s dive in.
Spoon And Level Method
This method is super simple. First, grab your measuring cup and a spoon. Follow these steps:
- Spoon the ingredient into the measuring cup.
- Fill it slightly over the top.
- Use the back of a knife to level it off.
Easy, right? This method is great for ingredients like flour and sugar. It ensures you don’t pack the ingredient down, which can give you more than you need. I remember once, I packed my flour while making cookies. They turned out like rocks. Not good!
Weighing Ingredients
Now, let’s talk about weighing. Using a kitchen scale can be more accurate. Here’s how you do it:
- Turn on your scale and set it to grams or ounces.
- Place your empty bowl on the scale and hit ‘tare’ to zero it out.
- Add your ingredient until you reach the desired weight.
Simple as that! Weighing is especially useful for baking bread or making delicate pastries. Ever tried making a soufflé? Trust me, precision matters. Weighing your ingredients can make a world of difference.
So, there you have it. Whether you spoon and level or weigh your ingredients, getting it right is key to delicious results. Try both methods and see what works best for you. Happy baking!
:max_bytes(150000):strip_icc()/__opt__aboutcom__coeus__resources__content_migration__serious_eats__seriouseats.com__images__2015__03__20150225-measuring-101-nila-jones-1-862c848585994794ad08b3a22d525ff5.jpg)
Credit: www.seriouseats.com
Measuring Liquid Ingredients
Accurate measurement of liquid ingredients is vital for baking success. Even a small error can lead to disappointing results. Knowing how to measure liquids properly ensures consistent and delicious baked goods.
Using Liquid Measuring Cups
Liquid measuring cups are essential for precise measurement. These cups have a spout for easy pouring. They also have clear measurement markings on the side. To use them correctly, place the cup on a flat surface. Pour the liquid into the cup slowly. Stop pouring when the liquid reaches the desired mark.
Reading The Meniscus
Reading the meniscus is crucial for accuracy. The meniscus is the curve seen at the liquid’s surface. For accurate measurement, keep your eye level with the cup. Look at the lowest point of the meniscus. This ensures that you measure the correct amount.
Measuring Sticky Ingredients
Ensure accurate baking by using non-stick spray or lightly coating your measuring cups with oil before measuring sticky ingredients. This helps in getting precise amounts and easy transfer to the mixing bowl. Simple yet effective.
Hey friends, today we’re going to talk about a common baking challenge: measuring sticky ingredients. Think about honey, peanut butter, or molasses. They can be tricky, right? They stick to everything, making it hard to get an accurate measurement. But don’t worry, I’ve got some tips to help you out.Greasing Measuring Tools
One of the easiest ways to measure sticky ingredients is to grease your measuring tools. Here’s how:– Use cooking spray: Spray your measuring cups and spoons with a light coating of non-stick cooking spray. – Rub with oil: Alternatively, you can use a little vegetable oil. Just dip a paper towel in oil and rub it on the inside of your measuring tools.This helps the sticky stuff slide right out, giving you a more accurate measurement. Plus, it makes cleaning up a breeze!Alternative Techniques
Don’t have cooking spray or oil handy? No problem. There are other techniques you can try:– Flour dusting: Lightly dust your measuring tools with flour. This is especially useful for sticky doughs and batters. – Hot water rinse: Run your measuring tools under hot water before using them. The heat helps to prevent sticking. – Plastic wrap: Line your measuring cups with plastic wrap, then measure your sticky ingredient. When you’re done, just lift the wrap out and all the sticky stuff comes with it.These methods are simple, but they work wonders. Give them a try next time you bake!Remember, accurate measurements are key to baking success. So, take a little extra time to measure those sticky ingredients properly. Your taste buds will thank you later.Happy baking!“`
Credit: www.globalkitchenjapan.com
Converting Measurements
Understanding how to convert measurements is essential for accurate baking. Different recipes use different systems. Some use the metric system. Others use the imperial system. This can be confusing. But don’t worry. With a few tips, you can master this skill.
Metric To Imperial
Many recipes use metric measurements. These are grams and liters. Others use imperial measurements. These are ounces and cups. Converting between the two is easy. You just need the right tools.
To convert grams to ounces, divide by 28.35. For liters to cups, multiply by 4.23. Always round to the nearest whole number. This keeps things simple. Practice makes perfect.
Using Conversion Charts
Conversion charts can be very helpful. They provide quick references. You don’t need to remember formulas. Just look up the value and its equivalent.
Keep a chart in your kitchen. You can find many online. Print one out. Laminate it for durability. This will save you time. You will be more accurate. Your baking will improve.
Adjusting For Altitude
Achieving accurate measurements is crucial for successful baking at high altitudes. Use a kitchen scale for precise ingredient amounts. Adjust recipes slightly to account for altitude changes.
Hey friends, today we’re diving into a topic that can make or break your baking: adjusting for altitude. If you live in a high-altitude area, you might have noticed that your cakes don’t rise as expected or your bread turns out too dry. Don’t worry; I’ve got you covered. Let’s explore how you can measure ingredients accurately and make those necessary adjustments for altitude.Impact Of Altitude On Baking
Living at a high altitude can significantly impact your baking results. At higher elevations, the air pressure is lower. This affects how ingredients interact and how your baked goods rise and bake. Here’s what you need to know:– Liquids evaporate faster: This can lead to dry and crumbly baked goods. – Leavening agents react more quickly: Your cakes may rise too fast and then collapse. – Sugar becomes more concentrated: This can alter the texture and structure of your baked products.I remember the first time I tried baking cookies in the mountains. They came out flat and spread out too much. I realized that I needed to adjust my recipe to account for the altitude.Adjusting Ingredient Quantities
So how do you adjust your ingredients to bake like a pro at high altitudes? Here are some simple tips:– Flour: Add 1-2 extra tablespoons of flour for every cup used. This helps to firm up the structure of your baked goods. – Liquids: Increase the amount of liquid by 1-2 tablespoons for every cup. This compensates for the faster evaporation. – Sugar: Reduce sugar by about 1 tablespoon per cup. This helps to balance the concentration. – Leavening Agents: Decrease baking powder or baking soda by 1/8 to 1/4 teaspoon per teaspoon. This prevents your baked goods from rising too quickly and collapsing.Here’s a quick table for reference:| Ingredient | Adjustment |
|---|---|
| Flour | Add 1-2 tbsp per cup |
| Liquids | Increase by 1-2 tbsp per cup |
| Sugar | Reduce by 1 tbsp per cup |
| Baking Powder/Soda | Decrease by 1/8 to 1/4 tsp per tsp |
Expert Tips For Consistency
Hey friends! When it comes to baking, accuracy is key. Even a tiny mistake in measuring ingredients can lead to a big difference in the final result. That’s why today, I’m sharing some expert tips for consistency in measuring ingredients. These tips will help you bake like a pro every time!
Practice And Precision
First things first, let’s talk about practice and precision. Just like any skill, measuring ingredients accurately takes practice. Here are a few simple tips to help you get it right:
- Use the right tools: Invest in a good set of measuring cups and spoons. For liquids, use a liquid measuring cup.
- Level off dry ingredients: When measuring flour or sugar, use a knife to level off the top. This ensures you get the exact amount needed.
- Weigh your ingredients: A kitchen scale can be your best friend. Weighing ingredients is more accurate than measuring by volume.
Remember, the more you practice, the better you’ll get at measuring accurately. And that means better baking results!
Keeping A Baking Journal
Now, let’s talk about something that might sound a bit old-school but is super helpful – keeping a baking journal. It’s like a diary but for your baking adventures. Here’s why it’s so useful:
- Track your successes and failures: Write down what worked and what didn’t. This helps you learn from your mistakes and improve.
- Note any adjustments: Sometimes you need to tweak a recipe. Write down any changes you made and how they affected the outcome.
- Record your favorites: Keep a list of your favorite recipes and any special notes about them. This makes it easy to recreate them perfectly.
Personally, I’ve found that keeping a baking journal has made a huge difference. It’s like having a roadmap to success in the kitchen!
So there you have it, friends. By focusing on practice and precision, and keeping a baking journal, you can measure ingredients accurately and achieve consistent baking results. Happy baking!
Credit: learntocook.com
Frequently Asked Questions
What Is The Most Accurate Way To Measure Ingredients When Baking?
The most accurate way to measure ingredients when baking is by using a digital kitchen scale. Weighing ingredients ensures precision.
How Do You Measure Correct Quantities Of Ingredients?
Use measuring cups and spoons for dry and liquid ingredients. Use a kitchen scale for precise measurements.
How To Measure 3 Oz Of Dry Ingredients?
Use a kitchen scale to measure 3 oz of dry ingredients for accuracy. Alternatively, 3 oz is roughly 6 tablespoons.
What Is The Correct Way To Measure Flour, Granulated Sugar, And Brown Sugar?
Measure flour by spooning it into a measuring cup and leveling it off. Scoop granulated sugar directly into the cup. Pack brown sugar firmly into the measuring cup.
Conclusion
Accurate ingredient measurement is crucial for perfect baking results. Use measuring cups and spoons. Level off dry ingredients for precision. Weigh liquids for consistency. Double-check measurements to avoid mistakes. Understanding these basics helps create delicious baked goods. Practice and patience improve your skills.
Enjoy baking with confidence. Happy baking!