

Knowing how to measure angles for road gradients is crucial for safe and efficient road design. Accurate measurements ensure a smooth and secure driving experience.
Understanding road gradients helps engineers design roads that are safe and functional. Measuring angles for road gradients involves simple tools and techniques. This skill is vital for anyone involved in road construction or maintenance. It ensures that roads are neither too steep nor too flat, which can affect vehicle control and safety.
In this guide, we will explain the basic methods for measuring angles, the tools you need, and tips for accuracy. Whether you are a student, a professional, or a curious learner, this information will be valuable. Let’s dive into the details.
Credit: en.wikipedia.org
Tools And Equipment
Hey folks! Today, we’re diving into the tools and equipment you need to measure angles for road gradients. Imagine you’re building a new road, and you want it to be smooth and safe. To make that happen, you need to measure the angle of the road’s slope accurately. Let’s talk about the essential tools and how to choose the right ones for the job.
Essential Measuring Instruments
First things first, you need the right tools to measure angles. Here are some of the most important instruments you’ll need:
- Protractor: This is a basic tool for measuring angles. It’s simple to use and very handy for small projects.
- Inclinometer: Also known as a slope meter, this device measures the angle of a surface. It’s great for checking the gradient of a road.
- Laser Level: A high-tech tool that uses a laser beam to measure angles and ensure surfaces are level. Perfect for precise measurements.
- GPS Device: Advanced GPS units can measure angles and elevation, making them useful for large-scale road projects.
Choosing The Right Tools
Now that you know the essential instruments, how do you choose the right ones for your project? Here are some tips:
- Consider the Project Size: For small projects, a protractor or inclinometer might be enough. For larger projects, you might need a laser level or GPS device.
- Think About Accuracy: If you need precise measurements, go for a laser level or inclinometer. These tools offer high accuracy.
- Ease of Use: Choose tools that are easy to use and understand. If you’re not familiar with advanced tools, start with basic ones.
- Budget: Keep your budget in mind. Basic tools are cheaper, while advanced tools like laser levels and GPS devices can be more expensive.
When I first started measuring road gradients, I relied on a simple protractor. It was easy to use and got the job done for small projects. As my projects grew, I invested in a laser level. The difference? Night and day. The laser level provided precise measurements that saved me time and effort.
So, whether you’re working on a small road or a major highway, having the right tools makes all the difference. Happy measuring!
Preparation
Measuring angles for road gradients might sound complicated, but with the right preparation, it becomes much easier. In this section, we’ll talk about the steps you need to take before you start measuring. This way, you can ensure everything goes smoothly and safely.
Safety Precautions
First things first, let’s talk about safety. Before you begin, it’s important to take some basic safety measures. Here are a few tips:
- Wear reflective clothing: This ensures that you are visible to any passing vehicles.
- Use traffic cones: Place them around your measuring area to alert drivers.
- Stay alert: Always keep an eye on your surroundings and be aware of any oncoming traffic.
These simple steps can help you avoid accidents and stay safe while you measure road gradients.
Setting Up The Measuring Area
Now that you’re ready to stay safe, let’s set up the area where you’ll measure. Follow these steps:
- Choose a clear day: Avoid measuring on rainy or foggy days. Clear weather helps you get accurate readings.
- Mark your start and end points: Use chalk or markers to clearly define where you will begin and end your measurements.
- Ensure the area is flat: Check that the measuring area is free from obstacles or debris that could affect your measurements.
- Set up your tools: Have your protractor, measuring tape, and any other tools ready and within reach.
Setting up your measuring area properly can save you a lot of time and effort. Plus, it ensures that your measurements are accurate.
In my experience, taking a few extra minutes to prepare can make a big difference. I once skipped marking my start and end points, and I ended up with skewed results. So, take your time to get it right!
With these preparation steps, you’re now ready to measure angles for road gradients effectively and safely. Stay tuned for the next steps in the process!
Basic Concepts
Hey friends, today we are diving into the basics of measuring angles for road gradients. It may sound complicated, but trust me, it’s pretty simple once you get the hang of it. We will cover some key points to get you started on the right track. Let’s begin with the foundation – angles and slopes.
Understanding Angles And Slopes
First things first, what are angles and slopes? Think of an angle as the space between two lines that meet at a point. It’s like the shape your legs make when you sit cross-legged. A slope, on the other hand, is the steepness or incline of a surface. Imagine you are riding a bike up a hill. The steeper the hill, the greater the slope.
When it comes to roads, the gradient is just a fancy word for the slope. It tells us how steep the road is. Understanding these basic concepts is the first step to measuring road gradients accurately.
Difference Between Degrees And Percentages
Now, let’s talk about the two most common ways to measure angles: degrees and percentages. It’s like choosing between two types of rulers. Both give you the same information, just in different ways.
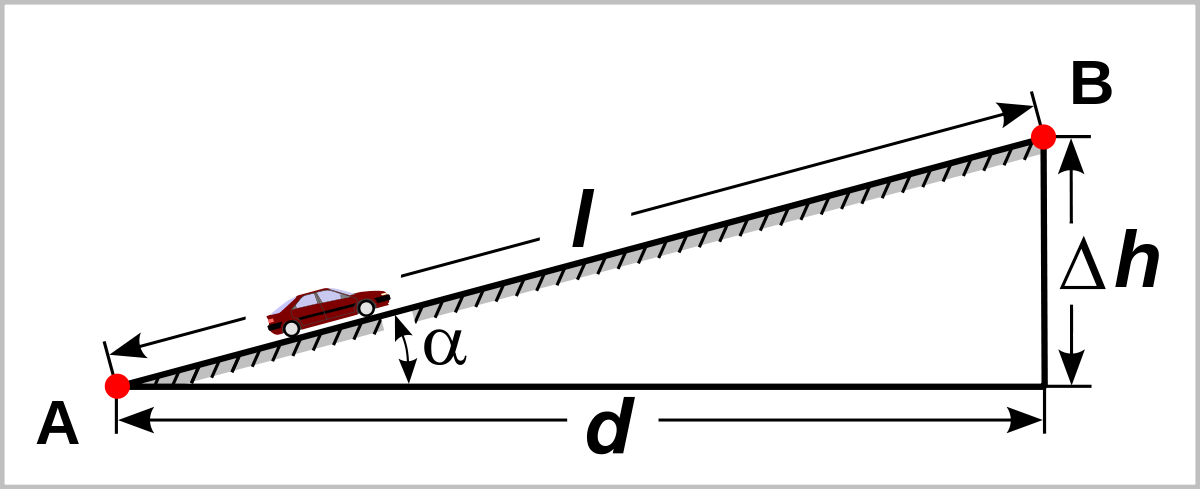
Degrees measure angles based on a circle, where a full circle is 360 degrees. If you imagine a hill, the angle of the hill’s slope is what you measure in degrees.
Percentages, on the other hand, are a bit different. They measure the rise of the hill as a percentage of the distance you travel horizontally. For example, a 10% gradient means that for every 100 units you go forward, you go up 10 units. It’s like thinking in terms of a fraction or a ratio.
Here’s a quick comparison to make it clearer:
| Degrees | Percentages |
|---|---|
| 45° | 100% |
| 30° | 57.7% |
| 15° | 26.8% |
See how they give us the same information? Just in a different format. So, you can use whichever one you find easier to understand.
Measuring angles and slopes may seem like a lot to take in, but with these basic concepts in mind, you’re well on your way. In our next section, we’ll dive deeper into the tools and techniques you can use to measure road gradients accurately. Stay tuned!

Credit: www.researchgate.net
Measuring Angles With A Protractor
Hey friends, today we’re going to talk about something really useful – measuring angles for road gradients using a protractor. It’s simpler than you might think. By the end of this, you’ll know exactly how to position and read a protractor to get accurate measurements. Let’s dive in!
Positioning The Protractor
First things first, you need to position the protractor correctly. Think of this as setting up a camera for the perfect shot. You want everything aligned just right.
- Place the protractor on the surface where you need to measure the angle. Make sure the base line (the flat edge of the protractor) is aligned with the surface.
- The center point of the protractor should be exactly where the slope starts. This is usually marked with a small hole or a notch.
- Adjust the protractor until it sits flat and stable. This is crucial for getting an accurate reading.
I remember the first time I used a protractor. I was a bit confused, but once I got the hang of positioning it right, everything else was a breeze.
Reading The Angle
Now that your protractor is in position, it’s time to read the angle. This part is like reading a clock – simple once you know how.
- Look at where the slope intersects with the protractor’s curved edge.
- Read the number on the protractor where this intersection occurs. This number is your angle.
- Make sure you’re reading from the correct scale. Protractors typically have two sets of numbers, one for angles measured clockwise and one for counterclockwise.
Reading an angle might seem tricky at first, but practice makes perfect. Just like riding a bike, once you get it, you never forget.
So there you have it! Measuring angles with a protractor is all about positioning it correctly and reading the right number. It’s a handy skill that will make your road gradient measurements much more accurate.
Using A Clinometer
Hey friends! Today we are diving into the world of measuring angles for road gradients using a clinometer. A clinometer is a handy tool that helps you measure angles accurately. It’s simple to use and gives precise results. Whether you are a road engineer or just curious about how roads are built, understanding how to use a clinometer can be super useful. Let’s break it down into easy steps.
Setting Up The Clinometer
First things first, you need to set up your clinometer correctly. Here’s how you can do it:
- Find a level spot: Make sure the ground where you are standing is flat. This will help you get accurate readings.
- Hold the clinometer properly: Keep the clinometer steady. Hold it with both hands to avoid shaking.
- Aim at a target: Choose a clear target on the road or surface you are measuring. This could be a point up the hill or down the slope.
When I first used a clinometer, I aimed at a distant tree. It made things much easier! Remember, setting up correctly is half the job done.
Interpreting Clinometer Readings
Now that your clinometer is set up, let’s read the angle:
- Look through the clinometer: Align your eye with the viewing hole of the clinometer.
- Read the scale: Look at the scale inside the clinometer. The number where the line crosses is your angle in degrees.
- Note the reading: Write down the angle. This will help you compare with other readings or calculate the gradient.
It’s like reading a thermometer, but for angles! The first time I did it, I was amazed at how straightforward it was. Just make sure to take a few readings to ensure accuracy.
Using a clinometer is as easy as pie. With a bit of practice, you’ll be measuring road gradients like a pro. And remember, always double-check your readings for the best results!
| Step | Action |
|---|---|
| 1 | Find a level spot |
| 2 | Hold the clinometer properly |
| 3 | Aim at a target |
| 4 | Look through the clinometer |
| 5 | Read the scale |
| 6 | Note the reading |
And that’s it! You’re all set to measure angles for road gradients with your clinometer. Happy measuring!
Advanced Methods
Measuring angles for road gradients requires precision. Advanced methods simplify the process, making it more accurate and efficient. These techniques use modern technology to provide reliable results. Explore the use of digital angle finders and GPS-enabled mobile apps to measure road gradients.
Digital Angle Finders
Digital angle finders are handy tools. They offer precise measurements of angles. These devices are easy to use. Place the finder on the road surface. The digital display shows the angle instantly. This method reduces human error. It ensures accurate readings every time.
Gps And Mobile Apps
GPS and mobile apps are useful for measuring road gradients. Many apps are available for smartphones. These apps use GPS data to calculate angles. They are user-friendly and convenient. Open the app and follow the instructions. The app will guide you through the process. It provides accurate results quickly.
Using these advanced methods makes measuring angles for road gradients easier. It saves time and ensures precision. Both digital angle finders and GPS apps are reliable tools. They help in achieving accurate gradient measurements.
Recording And Analyzing Data
Hey friends, today I’ll talk about Recording and Analyzing Data when measuring angles for road gradients. This is a crucial step to ensure you get accurate and useful results. But don’t worry, it’s simpler than it sounds. Let’s dive in!
Keeping Accurate Records
First things first, you need to keep accurate records. Think of it like keeping a diary. You jot down every detail so you don’t forget. Here’s how to do it:
- Use a notebook or a spreadsheet to log your measurements.
- Record the date and time you took each measurement.
- Note the specific location where you measured the angle.
- Write down any tools you used, like a protractor or a digital inclinometer.
This way, you have a clear and organized record. Trust me, it makes things much easier later on.
Interpreting Results For Practical Use
Now that you have all your data, it’s time to interpret the results. This means understanding what the numbers actually mean. It’s like reading a recipe before you start cooking. Here’s a simple way to do it:
- Look at the angle measurements and compare them to the standard road gradient guidelines.
- For example, a 5-degree angle might be perfect for a gentle slope, while a 15-degree angle could be too steep.
- Think about the purpose of the road. Is it for cars, bikes, or pedestrians? Different users need different gradients.
Once you understand the numbers, you can make informed decisions. Like a chef adjusting the recipe to suit the ingredients available.
And there you have it! Recording and analyzing data doesn’t have to be a chore. With a bit of organization and a clear plan, you can make sense of your measurements and use them to create safe and effective road gradients. Happy measuring!

Credit: x-engineer.org
Frequently Asked Questions
How Do You Measure Road Gradient?
Measure road gradient by dividing the vertical rise by the horizontal run. Multiply the result by 100 for a percentage. Use tools like a clinometer or GPS device for accuracy.
How Do You Find The Angle Of A Gradient?
To find the angle of a gradient, use the formula: angle = arctan(slope). The slope is the rise divided by the run. Use a calculator for arctan.
What Is The Formula For The Gradient Of A Road?
The formula for the gradient of a road is (rise/run) x 100. This gives the percentage slope.
How Can I Measure The Angle Of A Slope?
Use a clinometer to measure the slope angle. Alternatively, measure the rise and run, then calculate the arctangent.
Conclusion
Accurately measuring angles for road gradients is essential. It ensures safety and efficiency. Use the right tools and techniques. Practice makes perfect. With these tips, you can confidently measure angles. This knowledge helps in planning and constructing roads. Always double-check your measurements.
Consistency matters. Stay informed and updated. Proper measurements lead to better roads. Happy measuring!