

To measure and calculate stair dimensions, you need to follow specific steps. Accurate measurements are key to building safe and functional stairs.
Stairs are a crucial part of many homes and buildings. They provide access to different levels and must be constructed with precision. Understanding how to measure and calculate stair dimensions ensures safety and comfort. Whether you are building new stairs or renovating, knowing the right dimensions is essential.
This guide will help you learn the basics of measuring and calculating stair dimensions. You will discover how to get accurate measurements and avoid common mistakes. Let’s dive into the steps to make sure your stairs are built to last.
Credit: oakvalleydesigns.com
Understanding Stair Terminology
Understanding stair terminology is crucial for measuring and calculating stair dimensions. Knowing the right terms helps you accurately plan and build safe stairs. In this section, we will explore key stair terms like risers, treads, stringers, and nosing.
Risers And Treads
Risers are the vertical parts of a stair. They connect one step to the next. Each riser determines the height of your steps. Treads are the horizontal parts where you place your feet. They provide the stepping surface. The depth of each tread affects how comfortable the stairs are to use.
Stringers And Nosing
Stringers are the structural sides of the stairs. They support the risers and treads. Think of them as the stair’s backbone. Nosing is the front edge of the tread. It often overhangs the riser below. Nosing improves safety by providing extra space for your feet.
Measuring Stair Rise And Run
Hey friends, today we’re diving into the nitty-gritty of measuring stair rise and run. If you’ve ever tried to build or renovate stairs, you know it’s not as simple as it sounds. But don’t worry! I’m here to make it easy for you. By the end of this post, you’ll know exactly how to measure and calculate the dimensions of your stairs. Let’s get started!
Calculating Total Rise
First up, let’s talk about the total rise. This is the total height your stairs will climb from the bottom floor to the top. Think of it as the “up” part of your stairs.
Here’s what you need to do:
- Grab a measuring tape.
- Measure from the bottom floor to the top floor. This is your total rise.
Simple, right? If you’re unsure, just think about it this way: You’re measuring the vertical distance your stairs will cover. No fancy tools required, just a tape measure and a bit of patience.
Determining Total Run
Now, let’s move on to the total run. The total run is the horizontal distance your stairs will cover. Imagine laying a plank flat from the first step to the last step. That’s your total run.
Here’s how to measure it:
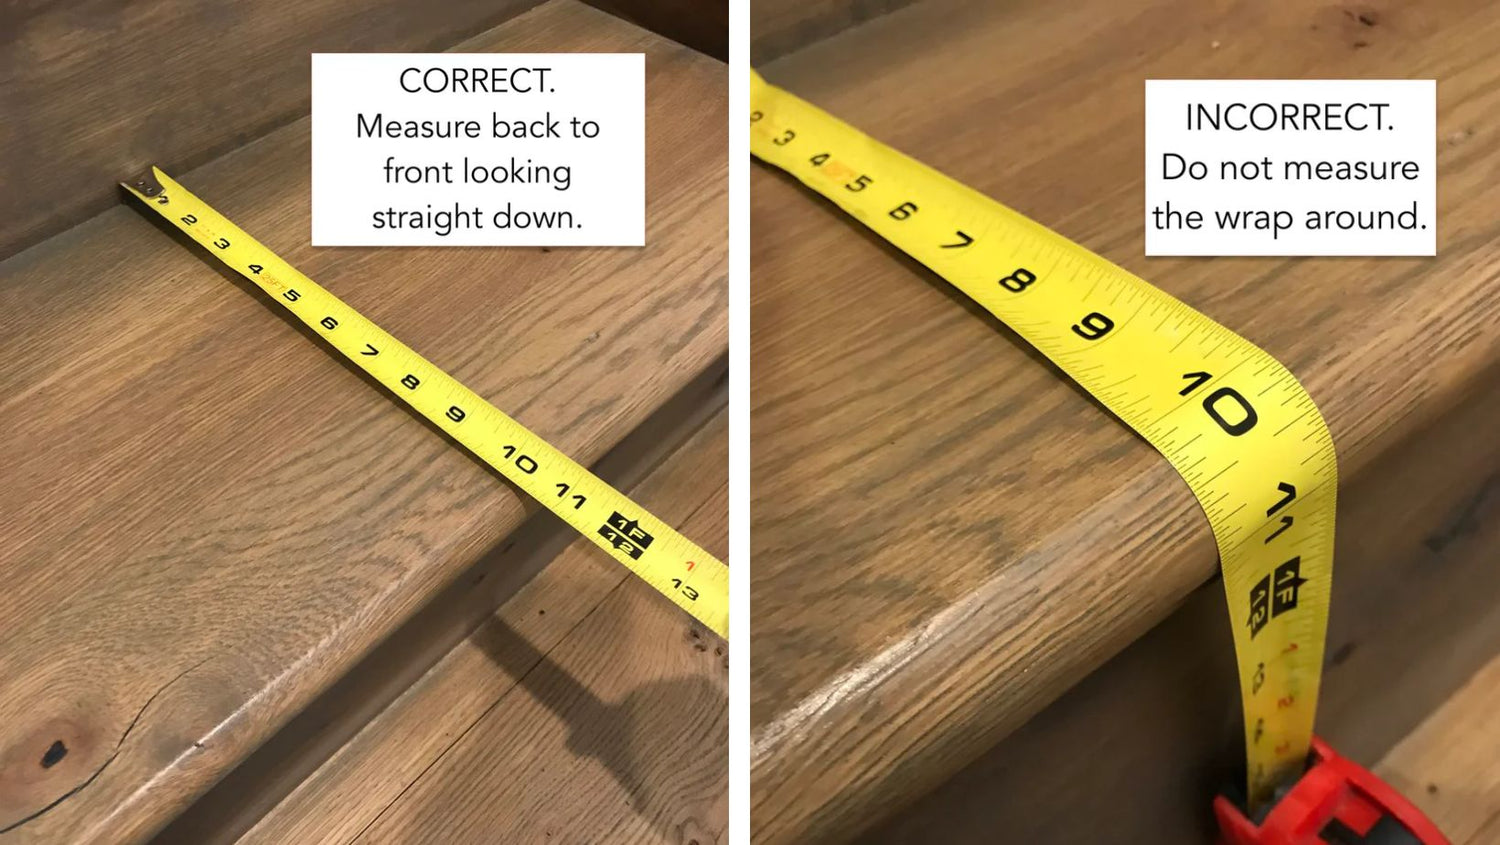
- Measure the depth of one tread (the part of the step you actually step on).
- Count the total number of treads in your staircase.
- Multiply the depth of one tread by the total number of treads.
For example, if each tread is 10 inches deep and you have 12 treads, your total run is 120 inches. Easy peasy!
By following these steps, you’ll have a clear idea of your stair dimensions. And the good news? You don’t need to be a math whiz to figure it out. Just a few simple measurements and you’re good to go.
When I first built my stairs, I was so confused. But once I broke it down into these simple steps, it all made sense. So, trust me, if I can do it, you can too!
Got any questions or tips? Drop them in the comments below. Happy measuring!
Calculating Individual Steps
Hey friends, today we’re diving into how to measure and calculate stair dimensions. It’s easier than you think. When you know the right steps, you can build stairs that are safe and comfortable. Let’s start with calculating individual steps. This part is crucial. It ensures each step is the right size. Ready? Let’s go!
Standard Step Dimensions
First, let’s talk about standard step dimensions. These are the usual sizes for steps. They are based on comfort and safety. Here’s what you need to know:
- Riser height: This is the vertical part of the step. The standard height is about 7 inches (18 cm).
- Tread depth: This is the horizontal part where your foot lands. The standard depth is around 10 inches (25 cm).
Think of these dimensions as a recipe. Just like baking a cake, following these measurements helps you create something reliable and safe.
Adjusting For Comfort And Safety
Now, let’s discuss adjusting for comfort and safety. Not all stairs are the same. You might need to tweak the dimensions to fit your needs. Here’s how you can do it:
- Measure the total rise: This is the height from the bottom to the top of the stairs. Use a tape measure for accuracy.
- Divide by the number of steps: If your total rise is 84 inches, and you want 12 steps, each riser will be 7 inches.
- Check the tread depth: Make sure each tread is deep enough for safety. Adjust if needed.
Here’s a quick tip: Don’t make the risers too high or the treads too shallow. Your stairs should be easy to walk on. Imagine carrying a heavy box up the stairs. You want each step to feel secure and comfortable.
I recently helped my friend build stairs for his new deck. We followed these steps, and the result was fantastic. Each step felt just right. It was safe and easy to use. So, take your time with these measurements. It makes a big difference.
There you have it! With these simple guidelines, you can calculate individual steps like a pro. Got any questions? Drop them in the comments below. Happy building!

Credit: tsarcarpets.com
Determining Stringer Length
Accurately determining the stringer length is crucial for building sturdy stairs. The stringer is the inclined board that supports the treads and risers. Calculating its length involves a few simple steps. This ensures the stairs are safe and comfortable to use.
Using The Pythagorean Theorem
The Pythagorean theorem helps calculate the hypotenuse of a right triangle. In this context, the hypotenuse is the stringer length. To start, measure the total rise. This is the vertical distance from the bottom floor to the top floor. Next, measure the total run. This is the horizontal distance the stairs will span.
Use the formula: Stringer Length = √(Rise² + Run²). Square the rise and the run. Add these two numbers together. Then, find the square root of the sum. This result is the stringer length. Round this number to a whole number for easier construction.
Accounting For Tread And Riser Thickness
After calculating the stringer length, account for tread and riser thickness. Both treads and risers add to the overall length of the stringer. Measure the thickness of one tread and one riser.
Subtract these thicknesses from the total rise and run. For example, if the riser is 1 inch thick, subtract 1 inch from the rise. If the tread is 1 inch thick, subtract 1 inch from the run. This ensures the stringer fits properly and the stairs are level.
Ensuring these adjustments helps maintain the integrity of the stair design. It guarantees a safe and reliable staircase. These steps are simple but essential for accurate stair construction.
Marking And Cutting Stringers
Marking and cutting stringers is crucial for building safe stairs. Stringers are the backbone of your stairs, supporting the treads and risers. Accurate marking ensures each step is level and consistent. Follow these steps for perfect stringers every time.
Using A Framing Square
A framing square is essential for marking stringers. Place the square on the 2×12 board. Align the riser measurement on one side and the tread measurement on the other. Mark the points where the measurements intersect. These marks will guide your cuts.
Repeat this process down the length of the board. Ensure each step is the same size. This guarantees uniform steps, making the stairs safe and comfortable to use.
Tips For Precise Cuts
Use a sharp pencil for clear, accurate marks. Double-check your measurements before cutting. This prevents mistakes that could waste materials. Use a circular saw for straight cuts. A jigsaw is useful for more detailed cuts.
Secure the board before cutting. This keeps the board steady and reduces errors. Cut slowly and steadily. Rushing can lead to uneven cuts, affecting the stair’s stability.
After cutting, sand the edges. This smooths out any rough spots and makes the steps safer to handle. Consistent and precise cutting ensures your stairs are both safe and visually appealing.
Assembling The Stairs
Assembling the stairs is a crucial step in ensuring a sturdy and safe staircase. This process involves attaching stringers, securing treads, and installing risers. Each part must be done with precision and care. Let’s break down these steps to help you assemble your stairs correctly.
Attaching Stringers
Start by positioning the stringers at the correct angle. Ensure they are firmly placed on the floor and secured to the upper landing. Use screws to fasten the stringers to the framing. Ensure each stringer is aligned properly. This guarantees the stairs will be even and stable.
Securing Treads And Risers
Next, install the treads. Place each tread on the stringers and secure them with screws. Make sure the treads are level. This will provide a safe surface for walking. After the treads, attach the risers. Position each riser between the treads. Use screws to secure them in place. Ensure the risers are firmly attached. This adds to the structural integrity of the stairs.
Final Adjustments
Hey friends, once you’ve measured and calculated the dimensions of your stairs, it’s time to make some final adjustments. These steps ensure your stairs are safe, level, and stable. No one wants to trip on a wobbly step! So let’s dive into the details of these final touches.
Checking For Level And Stability
First, you want to make sure everything is even. Grab a level tool. Place it on each step. Is the bubble centered? Great! If not, don’t worry. You can fix it.
Here’s a quick checklist:
- Place the level tool on each step.
- Check the bubble. It should be centered.
- Also, check the sides of the steps. Make sure they’re even too.
Making Necessary Corrections
If you find uneven steps, it’s time to make some corrections. This might sound tricky, but it’s not so bad. You just need to adjust the height of the risers or the depth of the treads.
Here’s a step-by-step guide:
- Use shims to adjust the height of the risers. A shim is a thin piece of material that helps level things out.
- For the treads, you might need to sand them down or add material to level them.
- Re-check with your level tool. Make sure everything is balanced.
A few years ago, I had to adjust my own stairs. It seemed daunting at first. But with patience, it turned out just fine. And the best part? The stairs were safe and stable for everyone to use.
Remember, these final adjustments are crucial. They ensure your stairs are safe and comfortable. So take your time, and double-check your work. Your future self will thank you!
Safety Considerations
Hey there! Today, we’re diving into an important topic – stair safety. Measuring and calculating stair dimensions isn’t just about getting the numbers right. It’s also about making sure your stairs are safe. That’s where safety considerations come in. Whether you’re building new stairs or fixing up old ones, you need to think about a few key things to keep everyone safe.
Building Code Requirements
First things first, let’s talk about building codes. These are rules set by local governments to keep buildings safe. For stairs, these codes will tell you:
- How high each step can be (the rise)
- How deep each step should be (the run)
- The width of the stairs
- How much headroom you need
These rules are important. They make sure stairs are safe for everyone to use. If you’re not sure what the codes are in your area, check with your local building department. Better safe than sorry, right?
Common Mistakes To Avoid
Now, let’s look at some common mistakes people make when measuring and calculating stair dimensions. Avoiding these can save you a lot of trouble:
- Inconsistent Steps: All the steps should be the same height and depth. If they’re not, people might trip.
- Ignoring Headroom: Make sure there’s enough space above the stairs. No one wants to bump their head.
- Skipping the Handrails: Always include handrails. They help people keep their balance.
- Not Following Codes: Always follow local building codes. They’re there for a reason.
Remember, safety first! By avoiding these mistakes, you’ll make sure your stairs are safe and comfortable.
So, that’s it for today. Building safe stairs isn’t rocket science, but it does take some careful planning. Keep these safety considerations in mind, and you’ll be on your way to building stairs that are not just functional, but safe for everyone. Happy building!

Credit: www.calculator.net
Frequently Asked Questions
How To Calculate Staircase Dimensions?
To calculate staircase dimensions, measure the total rise and divide by the desired rise per step. Determine tread depth and ensure proper headroom. Check building codes for compliance.
What Is The Formula For Calculating Stairs?
To calculate stairs, use the formula: Total Run = Number of Risers x Tread Depth. Ensure the riser height is comfortable.
What Is The 27 Rule For Stairs?
The 27 rule for stairs states that the sum of two risers and one tread should equal 27 inches. This ensures comfortable and safe stair usage.
How To Take Measurements For Stairs?
Measure the total rise from the bottom to the top of the stairs. Measure the run of each step. Record the width of the stairs. Ensure measurements are accurate for safety. Use these measurements to plan your stair construction.
Conclusion
Accurate stair measurements ensure safety and comfort. Always double-check your calculations. Follow the steps outlined for best results. Keep tools handy for quick adjustments. Remember, precise dimensions make a big difference. A well-measured stair is both functional and aesthetically pleasing.
Happy measuring!